How To Insulate Garage Doors
Walking into a garage that feels like a sauna in summer or an ice cave in winter is frustrating. The culprit might be poor insulation. Without it, heat slips away when you need it most, and unbearable warmth takes over when you just want a cool space. But insulation will help you take control, transforming your garage into a space that actually feels right. Follow this simple guide on how to insulate garage doors and give yourself the comfort you deserve!
How To Insulate Garage Doors
Preparation: Choose the Insulation
Selecting suitable insulation helps regulate garage temperature and prevent heat loss. Look for a material with a high R-value for better thermal resistance.
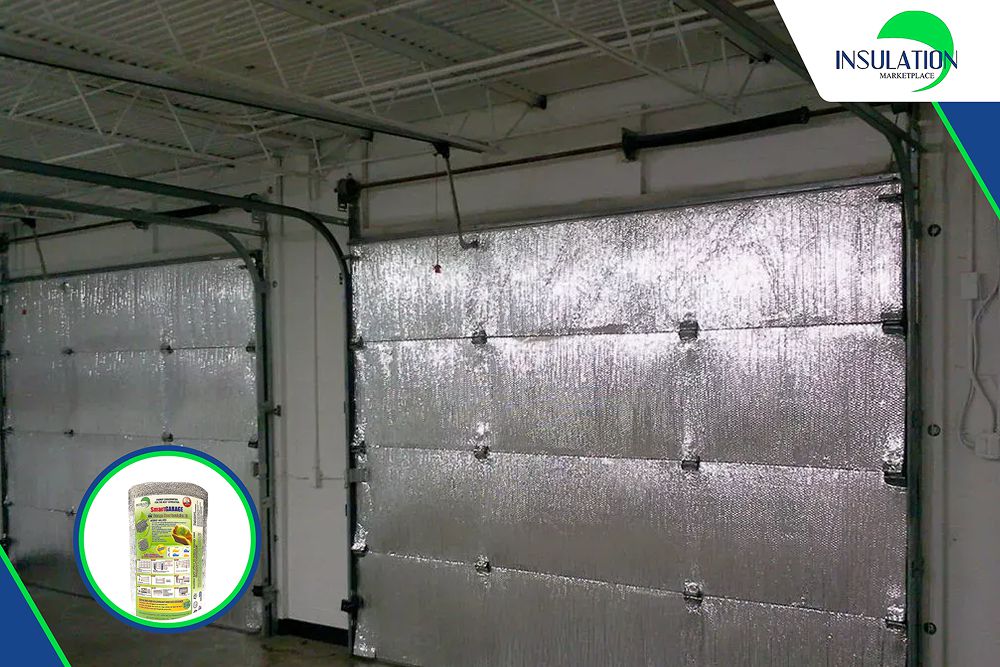
If you still do not know which insulation is suitable for your space, we have a recommendation for you, which is the SmartGARAGE Reflective Garage Door Insulation Kit from Insulation MarketPlace. This product is different from others on the market, with a reasonable price and comes with easy installation. Especially, it has an R-value of 8, which provides you with the best thermal resistance. Upgrade your garage today with SmartGARAGE Insulation Kit.
Step 1: Measure Your Garage Door
- Measure the distances A and B on your garage door. If your door has multiple panels, measure each one separately.
- Check pre-cut insulation: Ensure the insulation fits the panel dimensions.
- Cut straight: Use a straightedge board for precise cuts. Write down measurements to avoid mistakes.
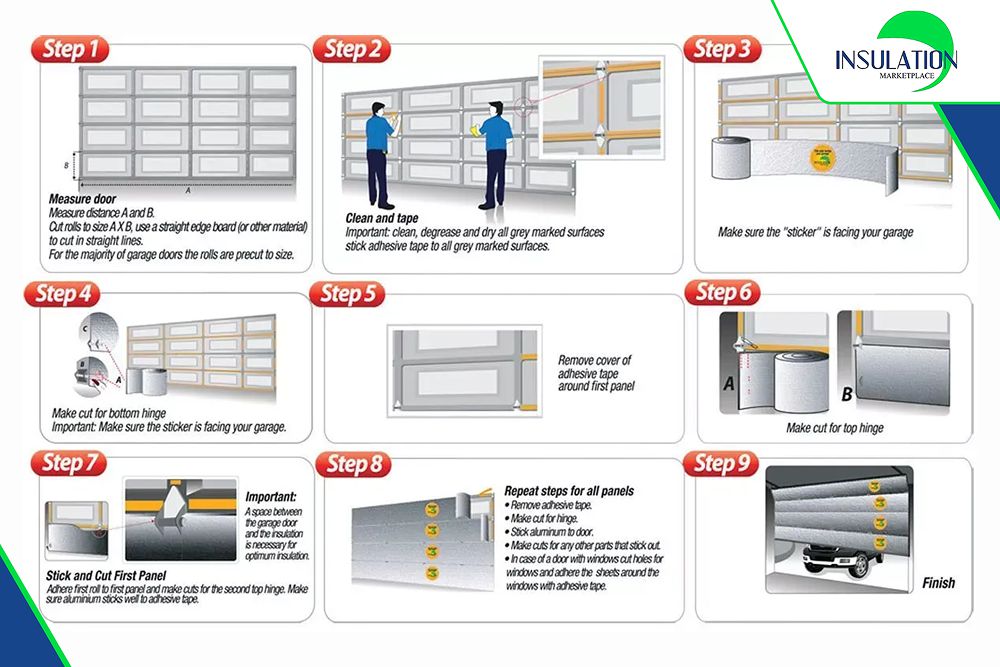
Step 2: Clean the Surface
- Clean the panels: Use a damp cloth with mild detergent to remove dirt, grease, and dust from the surface.
- Tackle stubborn grime: For tough stains, use a degreaser.
- Dry the surface: Wipe with a towel or let it air dry before applying adhesive tape.
Step 3: Position the Insulation
- Unroll insulation: Lay the insulation flat on a surface.
- Identify reflective side: Make sure the reflective side faces inward toward the garage.
- Check the fit: Hold the insulation against the first panel to test the fit. Trim it if needed to match the panel edges.
Step 4: Make Necessary Cuts
- Handle obstacles: If there are bottom hinges or handles, carefully cut around them using a utility knife or scissors.
- Don’t overcut: Leave the insulation snug, with no gaps, for better performance.
Step 5: Remove Adhesive Tape Cover
- Most insulation kits come with adhesive backing for easy installation. Peel off the protective layer slowly.
- Remove small sections at a time to prevent the insulation from folding or sticking before attaching it to the garage door.
Step 6: Secure the Insulation
- Apply the insulation to the garage door panel. Start from one side and smooth it out to the other to remove wrinkles and air pockets.
- Apply even pressure for a strong adhesive bond. Use a roller or your hands to press it down firmly if needed.
Step 7: Stick and Cut the First Panel
- Attach the first insulation panel securely. Then, move on to the next one.
- Trim if needed: Use a straightedge for clean, accurate cuts to align the panels perfectly.
Step 8: Repeat for All Panels
Apply the insulation to each panel, making sure each one fits securely. If there are windows, cut the insulation to fit. Check that each piece sticks firmly. Make sure no gaps are left between.
Step 9: Final Adjustments and Finish
- Check for loose edges: Once all panels are in place, press down any loose edges.
- Trim and adjust: Make any final adjustments for even insulation.
- Inspect your work: Step back and admire your fully insulated garage door—ready to boost comfort and energy efficiency!
Maintenance Tips after Insulation
To keep your insulated garage door in top condition, these simple maintenance steps should be followed after knowing how do you insulate a garage door:
- Regular inspections: This helps you detect issues like loose edges, rips, or damage early, allowing for repair or replacement to prevent further degradation.
- Lubricate moving parts: Prevent rust and reduce noise when opening or closing the door.
- Replace the bottom weather seal: Do this when you notice that any weather seal at the bottom of the garage door wears out
- Check door balance: Disconnect the opener and lift the door halfway. If it moves up or down instead of staying in place, the springs need adjustment to avoid strain on the opener.
- Adjust springs if necessary: If the door feels heavier after you add insulation to garage door, the springs may need recalibration. If unsure how to do this, contact a professional to avoid injury.

Upgrade Your Garage with High-Quality Insulation
By following the 9 steps about how to insulate garage doors above, your garage becomes a more usable, welcoming space. The SmartGARAGE Reflective Garage Door Insulation Kit from Insulation MarketPlace makes installation easy and delivers real results. Say goodbye to drafts and temperature swings. Let’s give your garage the comfort it’s been missing. Don’t settle for an uncomfortable space—order your insulation kit today and feel the difference!
FAQs
1. Does insulating a garage door make a difference?
Yes! An insulated garage door slows heat transfer, keeping your garage warmer in winter and cooler in summer. Experts estimate that insulation can lead to significant energy savings.
2. What is the best way to insulate garage doors?
The quickest and easiest way to insulate a garage door is to use a high-quality reflective insulation kit like SmartGARAGE, which is lightweight and easy to install.
3. Will insulating a garage door keep cold out?
Yes! Insulating a garage door blocks cold air and helps maintain a warmer indoor temperature.